Blog

  • Why I Don’t Not Use WordPress Backup Plugins

    TLDR: My Approach in Practice

    • No WordPress backup plugins installed.
    • Host-level backups running automatically in cPanel.
    • Manual backups downloaded periodically for peace of mind.

    I don’t rely on WordPress plugins for site backups at all – because my hosting provider on the server level already provides backing up files, databases, emails, and other stuff by default. With JetBackup 5 running automatically in cPanel, my site is protected without extra plugins, overhead, or clutter.

    Having backups already setup via cPanel, here are several reasons I avoid WordPress backup plugins. They all come down to performance, security, and simplicity.

    Performance & Bloat

    Backup plugins add unnecessary weight to WordPress. They often schedule resource-heavy tasks that slow down performance and generate multiple redundant archives. Since my host already handles backups at the server level, adding a plugin would only introduce inefficiency.

    Storage Clutter

    Plugins typically store backups inside the hosting account, quickly filling disk space with duplicate files. Host-level backups, on the other hand, are managed cleanly and efficiently. By skipping plugins, I avoid messy storage and keep my hosting environment lean.

    Security Risks

    Every plugin increases the attack surface of a WordPress site. Backup plugins require elevated permissions to access files and databases, making them potential targets. With cPanel backups already running, I don’t need to expose my site to that risk.

    Host-Level Backups Are Already Running

    As already mentioned, this is the key reason I don’t use backup plugins: my host includes JetBackup 5 in cPanel, turned on by default and free of charge. It automatically creates snapshots I can restore in minutes. That makes backup plugins redundant.

    Manual Backups for Extra Safety

    Even with host-level backups, I like to keep my own copies, seeing them being downloaded onto my computer. At least the site’s files and database:

    • Website root files: I download the entire site directory. On Linux-based servers, usually public_html folder.
    • Database: I export the database via phpMyAdmin.
      This way, I always have a local copy stored safely on my computer.
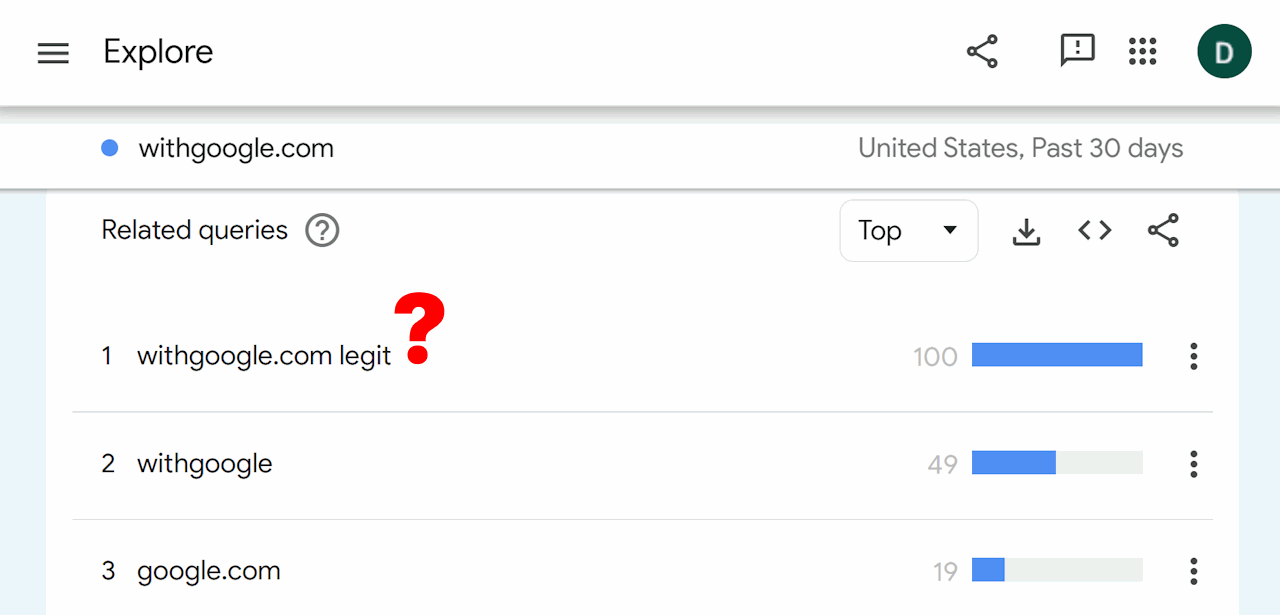
  • The withgoogle.com Example Shows Why Domain Names Matter

    withgoogle.com Example Showing Why Domain Names Matter

    The first time I came across the withgoogle.com domain, seeing the labs.withgoogle.com subdomain as the home of Google’s experiments, I was baffled. My immediate question was: Is this domain legit?

    So it didn’t surprise me when I recently noticed on Google Trends that the most searched query related to Google’s own withgoogle.com domain is “withgoogle.com legit.”

    The inclusion of with in the domain name, combined with the brand of one of the world’s most recognized companies, understandably raises eyebrows.

    This shows how much domain names matter – if they look unusual, people immediately question their legitimacy. It’s a reminder that domain names are trust signals.

    Domain Names are Important for Visitors Trust

    This was a reminder to me that:

    • A clear, intuitive domain builds confidence and credibility.
    • If a domain looks unusual or off-brand, users hesitate or assume it’s unsafe.
    • A clear, intuitive domain reduces the risk of being mistaken for phishing or scam sites.
    • Users avoiding clicking on your site on search result pages sends negative SEO signals to search engines.
    • Even Google faces questions when using unconventional naming – so for smaller businesses, the stakes are even higher.

    So, choose a domain name that’s simple, aligned with your brand, and easy to trust. It can mean the difference between attracting visitors and losing them to doubt.

    How to Tell if withgoogle.com and Other Sites are Legit?

    In case of withgoogle.com, you shouldn’t worry, since the domain is actually owned and run by Google. The same applies to its labs.withgoogle.com subdomain, which features their various experimental tech projects.

    To verify this or any other domain name legitimacy, you can check out who owns the domain and subdomain by using lookup.icann.org or other whois service.

    https://lookup.icann.org/en

    The output of withgoogle.com query shows that the owner is Google LLC, based in California, United States. The same applies to the labs.withgoogle.com subdomain.

    So, both withgoogle.com and labs.withgoogle.com are legit. You can take a look at their experiments without worrying.

    Of course, website owners’ domain name choices shouldn’t make their visitors doing whois lookups before visiting their site.

    P.S. if you only use withgoogle.com without the labs subdomain in front of it, you’ll be redirected to google.com.

  • bbPress Discussion Forum Schema & SEO Rich Snippets – Free WordPress Plugin

    bbPress Discussion Forum Schema & SEO Rich Snippets – Free WordPress Plugin

    Here’s a useful WordPress plugin if you are running a bbPress forum. The bbPress Discussion Forum Schema & SEO Rich Snippets plugin automatically upgrades your bbPress forum topics with advanced “DiscussionForumPosting” structured data for free.

    By providing search engines with precise details about your community threads – including active reply counts, author information, and conversation structure – it helps your content qualify for specific “Discussion and Forum” rich results in search listings.

    The plugin works silently in the background to prioritize this specialized forum data over standard page settings. It ensures search engines clearly understand your content is a dynamic conversation.

    The plugin requires no configuration. Simply activate it to instantly improve how your forum topics are presented to the world.

    You can download the plugin for free here:

    How to Install Plugin

    1. Download the plugin using the button above.
    2. Upload to WordPress:
      • Log in to your WordPress Dashboard.
      • Go to Plugins > Add New.
      • Click the Upload Plugin button at the top.
      • Select your .zip file and click Install Now.
    3. Activate:
      • Click Activate Plugin.
    4. Important Final Step:
      • Clear your site cache (and any server-side cache like Cloudflare) to ensure the old schema is removed and the new one appears immediately.

    If you have any questions or suggestions about the plugin, use the comment form below.

  • Failed: Robots.txt Unreachable Error in Google Search Console – Solved

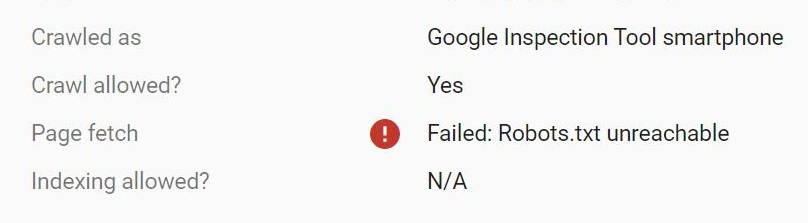
    Failed Robots.txt Unreachable Error - Google Search Console

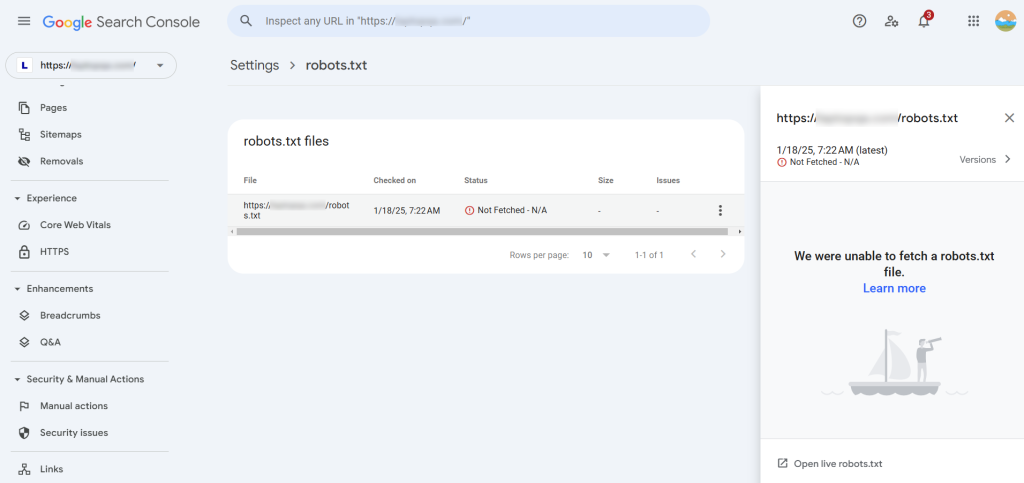
    Here’s how I solved the Failed: Robots.txt Unreachable and Robots.txt Not Fetched errors in Google Search Console. The issue itself is serious, since it prevents Google bots from crawling and indexing your website and webpages.

    Google Search Console - robots.txt not fetched error

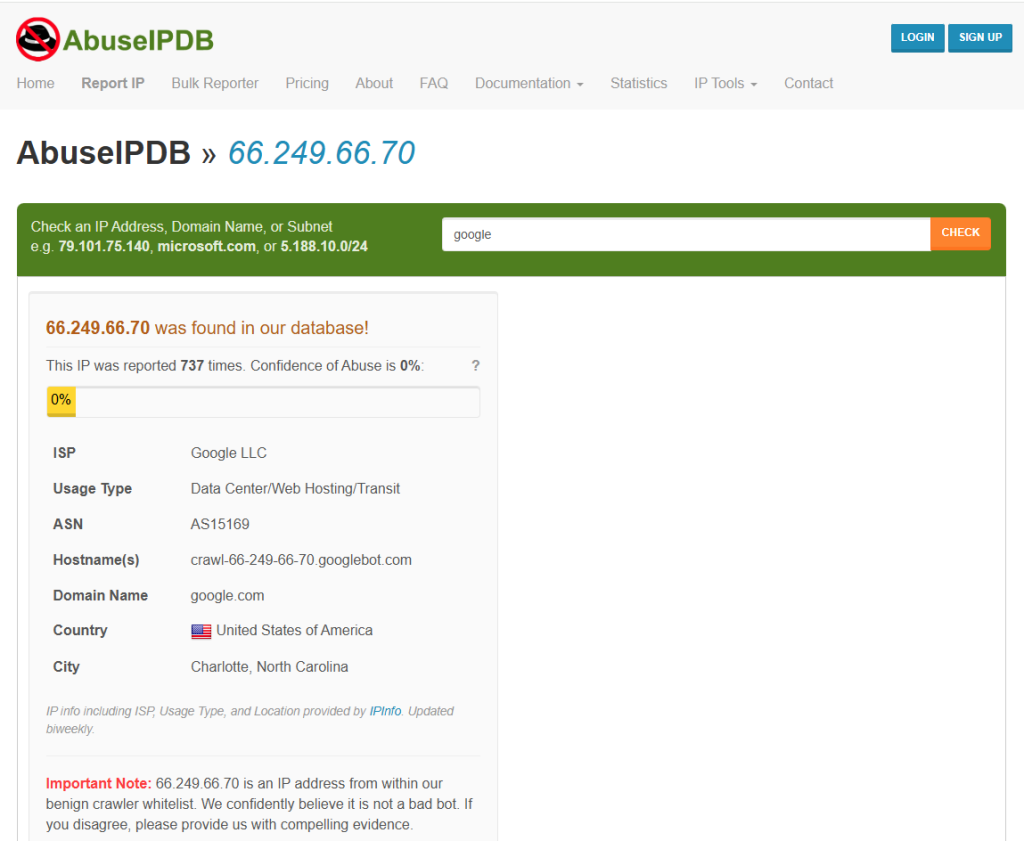
    The solution I found is to unblock Google bot IPs in your web hosting server’s firewall. Yes, although Google bot isn’t a “bad bot” it can get on the blacklist. For instance, like this:

    So, contact your web hosting provider and ask them to check if the Google bot IPs are blocked on the firewall, and if they are ask for unblock. Also your web host may have a user interface where you can check and unblock the IPs yourself.

    There are multiple Google bot IPs. They start with 66.249… Here is the full list of the IPs.

    Of course, the fix works if you don’t have other issues with accessing the robots.txt and the website itself, such as DNS issues, file permissions, and similar.

  • Customize Missing from WordPress Theme? Here’s Solution

    If you are new to WordPress themes based on Gutenberg blocks, such as the latest Twenty Twenty-Four, you may notice that the Customize option in the WordPress’ admin section is missing. Instead, the block-based themes use the Site Editor to customize the look of your WordPress site.

    Nevertheless, although the Customize button is missing, you can still access its interface easily.

    (more…)
  • How to Change Link Underline Color in WordPress Using CSS

    The user interface of the WordPress’ default Site Editor doesn’t have an option for changing the link underline color, so it can be different from the link font color. Luckily, with a bit of CSS code added to the Additional CSS section of the Site Editor interface, you can easily change the underline color of your links separately.

    Here’s how to do that using the text-decoration-color: yourcolor CSS code.

    Go to Site Editor > Styles > Additional CSS.

    In the Additional CSS section add the following line to make the links on your WordPress site underlined with your desired line color. For this example we will use the blue underline color.

    a {text-decoration-color: blue}

    Now, your links will be underlined with a blue line, regardless of the color of the actual font you use. Of course, the blue line will show up only under links which do have text underline enabled.

    Keep in mind that the a {text-decoration-color: blue} line only changes the underline color of links in the default state and not in other states like hover, active, or visited. To change these colors as well, use the a:hover, a:active, and a:visited link states in CSS, like this:

    a:hover {text-decoration-color: blue}
    a:active {text-decoration-color: blue}
    a:visited {text-decoration-color: blue}

    In some cases, you may want to change the underline color of links only in a specific element of the website. For example, to make the change only in the actual content of blog posts, use this line:

    .entry-content a {text-decoration-color: blue}

    Have a comment, question or suggestion about this post? You can use the comment section below.

    If you want me to implement this code on your site, feel free to contact me.

  • Force HTTPS to Avoid Duplicate Page Indexing by Google

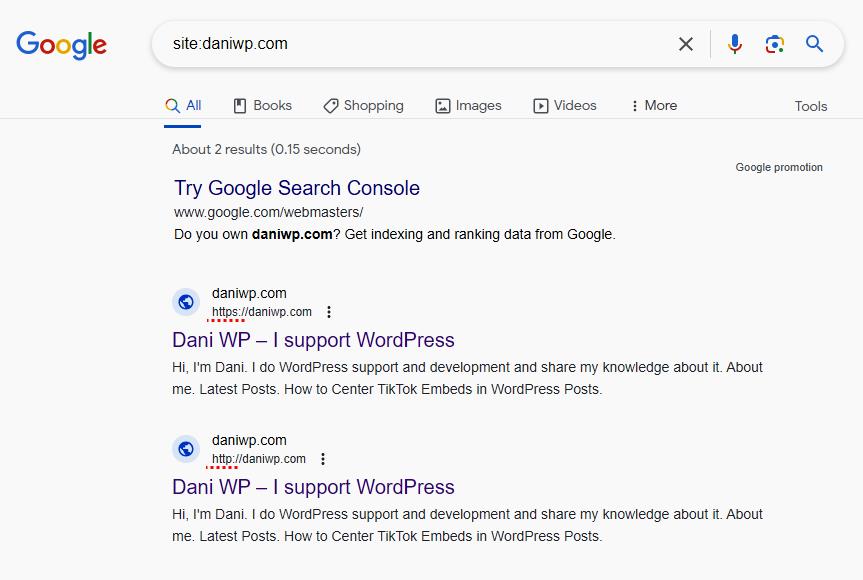
    Having enabled access to both HTTPS and HTTP versions of your website may lead to duplicate content.

    For instance, the Google Search may index both HTTPS and HTTP versions of your site’s webpages, which may create unnecessary duplicates in the search results like this:

    Having duplicate pages indexed isn’t good from the SEO perspective. Furthermore, you don’t want users accessing the non-secure HTTP pages and getting the connection not secure alert messages in their browsers.

    You can avoid these problems by forcing use of HTTPS.

    This can be done by adding a few lines of code to the .htaccess file that’s usually located in the websites’ root directory on the server.

    RewriteEngine On 
    RewriteCond %{HTTPS} off 
    RewriteRule ^(.*)$ https://%{HTTP_HOST}%{REQUEST_URI} [L,R=301]

    Please keep in mind that some web hosting providers have the HTTPS forcing option in their settings interfaces. Also, your web host has maybe already automatically added this or similar code to force HTTPS.

    Of course, all of this is possible only if you have an SSL certificate up and running on your website.

    Have a question or suggestion about this? Let us all know using the comment form below.

    If you want me to implement this tip on your WordPress website, feel free to contact me.

  • How to Center TikTok Embeds in WordPress Posts

    If you have a hard time trying to center the TikTok embeds you added to your WordPress posts via the WordPress built-in embedding feature, try this piece of CSS code.

    .wp-block-embed__wrapper  {display:flex!important; justify-content:center; align-items:center}

    My tests show it’s also possible to center YouTube and Twitter embeds this way besides the TikTok embeds, while the WordPress embed feature and the CSS code above don’t work for Facebook, Instagram, and Pinterest posts.

    I tested the CSS code on the Gutenberg-based Twenty Twenty-Four theme.

    If you want me to implement this customization on your WordPress theme, feel free to contact me.

  • How to Replace WooCommerce External / Affiliate Product Button Text Using MySQL

    There’s an easy way to replace the default WooCommerce Buy product button text on the External / Affiliate products by editing the functions.php file of your WordPress theme. But, here I show how to change the button text using MySQL.

    The MySQL method is helpful if you want to keep the ability to have different button texts on different external / affiliate products, since the method via functions.php forces the text on all of them to change to the single text you choose.

    So, here’s the MySQL command to replace text in the products’ _button_text field (in bulk):

    UPDATE wp_postmeta SET meta_value = replace(meta_value,'OLD TEXT','NEW TEXT') WHERE meta_key = '_button_text';

    The MySQL method works if you have already entered a custom button text instead of the default Buy product text in the Button text field of your External / Affiliate products. This is normally done in the Product data section of the regular WooCommerce product editor in the wp-admin area of your website.

    If you haven’t changed the default Buy product text in the Button text field, the particular product won’t have its _button_text field in the wp_postmeta MySQL table.

    Nevertheless, if you don’t mind having a fixed single variant of the button text here’s the functions.php code snippet for changing the default Buy product button text to your desired text:

    // Change Buy product text on product archives pages
    add_filter('woocommerce_product_add_to_cart_text', 'woocommerce_add_to_cart_button_text', 10, 2);
    // Change add to cart text on single product page
    add_filter('woocommerce_product_single_add_to_cart_text', 'woocommerce_add_to_cart_button_text', 10, 2);
    
    function woocommerce_add_to_cart_button_text($button_text, $product) {
        if ('external' == $product->get_type()) {
            $button_text = __('New External Link Button Text', 'woocommerce');
        }
        return $button_text;
    }

    If you want me to implement this on your WooCommerce installation, feel free to contact me.

  • How to Add Prefix in Front of WooCommerce Product Price

    Here’s my version of the code that adds a prefix to the price of products in Woocommerce.

    (more…)